I continue to run into folks that have never heard the term "Fractional CxO", or…
How to Use Memorized Transactions in QuickBooks
Tired of repetitive data entry? QuickBooks provides a way to save time and keystrokes when you create some transactions.
We wrote last month about the benefits of having QuickBooks on your desktop. Among those we listed are three that have impact on every business that uses it. QuickBooks helps you:
- Save time.
- Save money.
- Minimize errors.
There are numerous examples we could use to illustrate how the software accomplishes this. What we want to talk about this month is the use of memorized transactions. These are templates you set up that contain most if not all the information that could be repeated at specified intervals, eliminating the need for you to enter the same repetitive data regularly and reducing the chances that you’ll make a mistake.
You can create these transaction “models” for both sale and purchase transactions. For example, you might have wireless service bills that remain the same every month or vary by just a bit. Or, you have customers who have monthly standing orders for the same products, or services, or subscription fees.
QuickBooks makes it very easy to set up transactions for repetitive use. Here’s how it works. We recommend you use one of QuickBooks’ sample files for this tutorial.
Creating a Template
Let’s start by creating a repeating bill. Click Enter Bills on the home page and complete all the fields that will remain the same every time the bill is created. In our example, we’re paying a utility bill whose Amount Due will change every month, so we’re leaving that blank. When you’re done, click Memorize in the toolbar to open this window:
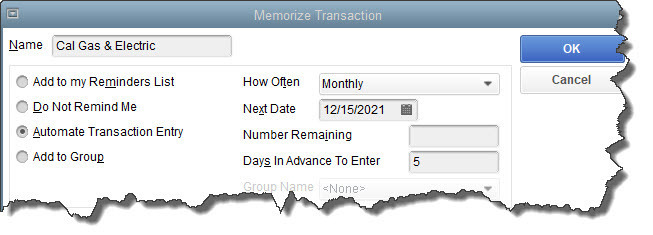 Once you’ve created a transaction template, you’ll have to complete the fields in this window to memorize it correctly.
The vendor name appears automatically in a field in the upper left. Below that is a list of four options. These have to do with how/if you want to be notified when it’s time to process a memorized transaction. Your choices are:
- Add to my Reminders List. QuickBooks will display an entry in your Reminders List for each memorized transaction. Not using Reminders? Let us help.
- Do Not Remind Me. Nothing will be done.
- Automate Transaction Entry. You would only select this option if nothing but the date of the transaction changes when it recurs. QuickBooks would automatically process and dispatch the transaction.
- Add to Group. If you have multiple recurring transactions that come due at the same time, you can create Groups and assign transactions to them (more on this later).
On the right side of the window, open the drop-down list in the field next to How Often and select from the options provided. Click the calendar icon to choose the transaction’s Next (Due) Date. If you only want QuickBooks to automate the entry a specific number of times, add that in the field next to Number Remaining. Then enter the Days In Advance To Enter.
Further Explanation Needed
We’d like to expand on two of the concepts discussed here. First, advance notice for transactions. If you’ve selected Add to my Reminders List for any memorized transactions, you need to tell QuickBooks how far in advance your reminders should start to appear. Open the Edit menu and select Preferences, then Reminders.
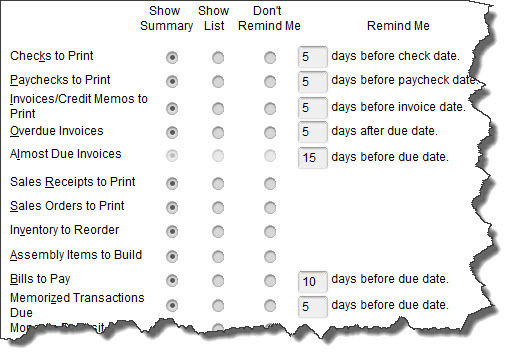 If you want Reminders for memorized transactions, you’ll need to tell QuickBooks what your Preferences are.
Memorized Transactions Due appears toward the bottom of the Company Preferences list. Click on the appropriate button to indicate whether you want to see a summary or a list in your Reminders (or nothing at all) and how many days in advance the alert should appear.
Also, Groups. As we mentioned earlier, you can combine memorized transactions due at the same time within a group. To create one, go to Lists | Memorized Transaction List. Click the arrow next to Memorized Transaction in the lower left, then click New Group and give it a name. Choose from the options available for notification and click OK.
Now you can add memorized transactions to this Group by right-clicking on it, selecting Edit Memorized Transaction, and clicking in the button next to Add to Group. Click the down area to the right of the field assigned to Group Name and select the one you just created.
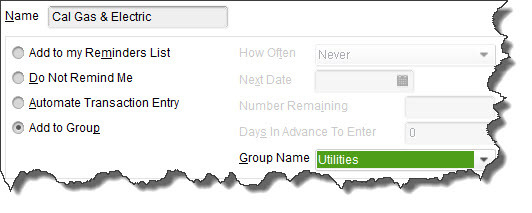 You can add memorized transactions to a Group and process them at the same time.
Caution Advised
We’ve explored this QuickBooks feature with you because we wanted you to see one of the ways that the software can save time and minimize errors. There are many others, and we’re always happy to introduce you to more.
The mechanics of creating memorized transactions are fairly simple. But mistakes can be costly in terms of bills that don’t get paid on time (or at all) and items or services that don’t get invoiced. If you’re new to QuickBooks, we certainly suggest you not work with these on your own. Even if you’re a seasoned user, you may want our help setting up memorized transactions for the first time. Let us know if you need assistance with this or any other element of QuickBooks accounting, we’re ready to help.


